Saturday, January 31, 2015

Fiber Festival and Spinning Wheels

This weekend is the Oxford Fiber Arts Festival! For someone with an addiction to fibers it is the worse place in the world to go to, but I went anyway.

Yesterday I took a spinning class hoping I wouldn’t like it, it didn’t work. My yarn isn't the prettiest, but I'm hooked and want to buy a spinning wheel.


When I thought about spinning wheels I thought about the old fashion kind you see in paintings. These are called Saxony designs. 
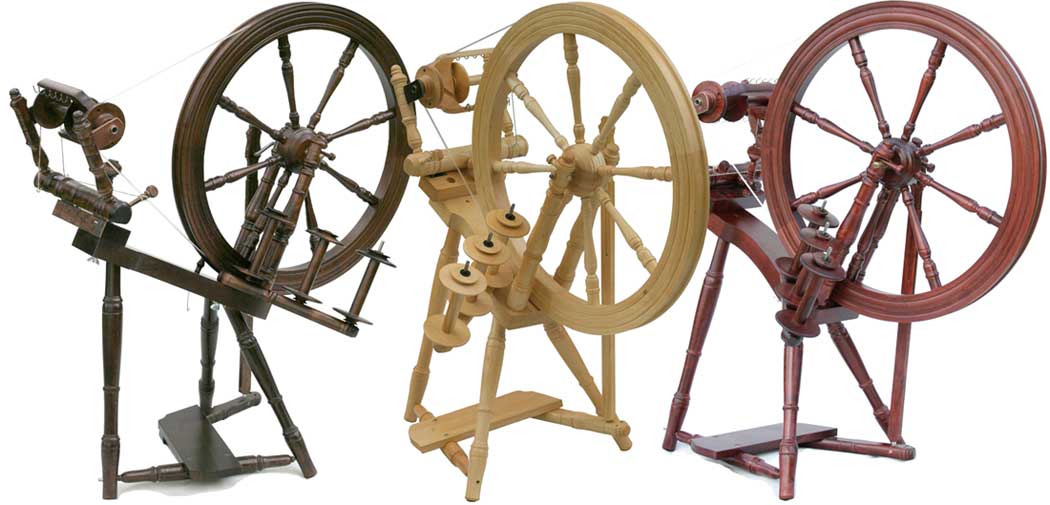
The Interlude from Kromski 

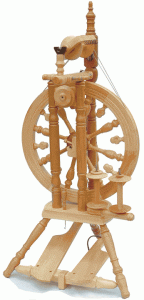
What I learned yesterday is there is also what is called the Castle design. The Castle design stands more upright and takes up much less room. 
           
The Minstrel from Kromski
The wheel I used in the class was a castle design from Kromski called the Minstrel. Of course I fell in love with it and want one and ... it’s one of the more expensive wheels. I really hate when I fall in love with expensive things because it’s hard to convince myself to go for the cheaper versions. However, it does take up much less room than the cheaper alternative so that’s helpful.

Not only did the teacher sell me on the idea of buying a spinning wheel she also sold me on the idea of owning sheep and a llama (she said one llama will be enough).  

I am still debating on which style to get and these are the two I narrowed it down to. 

Saxony design called the Interlude http://kromskina.com/the-interlube/

Castle design called Minstrel http://kromskina.com/the-minstrel/


Thursday, January 15, 2015

Painting Bookshelves

Sometimes I have great ideas, and sometimes I have brilliant idea, then today… I had a not so smart idea. The only thing left to do in the guestroom is hang a few pieces of art and build bookshelf-nightstands. Until I get around to building the bookshelves I thought I would paint some bookshelves I had. They were black and did not look right in the room. I could have just left them since they are temporary, but I don’t know how long it will take me to build the new ones so I wanted to paint them. 


Since its so cold I can’t spray paint them. (I’ve tried spray-painting in this cold and the can freezes and the paint stops. I’m sure there is a scientific reason for this, but I just think it’s a sign its too cold to be painting.) Then I was thinking about the last time I painted the bookshelves and I remembered that because of how they are made most of the paint went through the spaces and didn’t end up on the shelf.

That’s when I decided it might be easier to use a paint roller! And I could use left over trim paint. So it would match beautifully and be free!

So I put down an old blanket and moved the shelf into the den to paint… Any guesses where this is going?


Well, I didn’t get paint anywhere but the shelf or blanket! I was at least thankful about that. However, I could not use a roller it wouldn’t get all the crevices so I switched to a regular brush. A ridiculously long time later there are still spots that didn’t get covered and I gave up.


I have not completely given up, just for the minute. In the past week I have decluttered a ton of stuff, I’m pretty sure if I piled it all up and weighed it… it would come close to a ton! I finished my dinning table, organized the office, and painted and organized the laundry room. All the work finally caught up with me and I am just tired. Maybe when I’m not as tired I’ll try painting the shelves and it will work better… or maybe I’ll wait till its warmer and spray-paint… or just leave them as is till I build new shelves.

Tuesday, January 13, 2015

Removing Wax Buildup from Wood Surfaces

When I realized I would have to strip a very thick layer of wax off the top of my dinning table, I started searching the Internet for easier ways than sanding. I really hate sanding! It was over 20 years of wax that was about ¼ - ½ inch thick, and that would have been a pain to stain. 
The light spot in the bottom left spot is where I tired sanding the wax off. 


I found a couple different solutions that I thought I’d share.

1. A mix of equal parts white vinegar and water.
This is supposed to be safe if you are worried about harming the finish of the table. You soak a rag in the mix and then rub in circles removing the wax. I could see it start to work but there was a lot of wax and this would take forever! So I moved on to option 2.

2. Vinegar water mix with cream of tartar.
I didn’t have any cream of tartar so I thought maybe baking soda would work. I forgot that baking soda and vinegar fizzes, that was actually kind of fun and added comical relief, and it worked really well! I poured baking soda on the table and used a rag dipped in the vinegar and water mix to rub off the wax. After about an hour, I had only cleaned about a foot of the table (the is an over estimate). So I moved on to option 3.

3. Steel wool.
I soaked the steel wool in the vinegar water mix and this worked great but gave me an idea. Mind you this will strip the finish off, so don’t use it if you want to protect the finish.

4. Straight edge razor blade.
The steel wool had worked great, but I had to use a lot to get through the wax. I took the soaked steel wool and wiped it over the whole table, the vinegar started to break down the wax while I started scraping the wax off with a razor blade. It was much quicker than anything else. It would strip of all the layers of wax in one swipe.
Top: years of wax buildup.
Bottom: freshly cleaned wood
After I cleaned the whole tabletop, I sanded some burn marks and water rings off and waxed the table.
Finished Table Top


Sunday, January 11, 2015

Finished Guest Room Redo

We finally finished the guest room… for now. To make things simple I decided to just recreate the master bedroom in the guestroom. This meant all that had to be done was paint and move furniture we already had.
My reasoning was simple, I loved how elegant and relaxing my bedroom was, but because of fabric, allergies, and dogs, I hated the upkeep. The headboard is upholstered, the valances are upholstered and the draperies are lace… and all collect dust! If I moved them into the guestroom it means less work for me and a pretty room for the guests!
Because we were using furniture from other rooms in the house it made it very quick and easy to finish the guest room, but it meant the rest of the house was thrown into chaos. (It didn’t help that once I got started, I had Vince move other furniture around in other rooms, creating more chaos.) At least the guest room is in order and mostly finished. The only thing left to do is build the shelves I want as nightstands and add some more art to the walls.
You might notice that the current bookshelves are two different colors. There is a very good reason, but it is a long story.


Friday, January 9, 2015

Office Organization and Decluttering

So I mentioned we moved a bookshelf/desk unit into the now empty office. Well, since the weather is so cold I can’t or won’t go outside to paint the bookshelves for the guestroom and few other things that need to be painted. I decided to stay in the warm house and organize and declutter the office.

Two days of sorting, throwing away, donating, later the office is clean and usable. I can now get in there and work on projects and find things easily. There are now two desks in the office, my sewing machine is out and easy to access, and there is a big open space in the center to set up my worktable.

My desk
Vince's desk


Once I finish the guest room, I’m going to get in here and change the terrible drapes that I hate, and maybe paint the big bookshelves. They were painted when I was about 11 … so they are rather little girlish and very beat up. But after all the other painting projects I may just decide to not paint them. I also can't wait to hang art on the walls, I have quite a bit of art in closets I want to hang in here. 


We also moved the ferrets into the office and they like it much better (and so do I).  If you notice the dog, that Cleo, she feels the need to be in photos. 

Vince wasn't here when I did all this so I piled up his stuff on his bookshelf and now he gets to organize and declutter!